bbPress Notify (No-Spam) BuddyPress Bridge Documentation
bbPress Notify (No-Spam) BuddyPress Bridge Documentation The BuddyPress Bridge is a premium add-on for bbPress Notify (No-Spam) – bbpnns – that lets you integrate bbpnns

I’ve had a VPS server at Rimuhosting.com for years to host UseStrict Consulting and other websites. I really enjoyed having root access and all the liberties that come with it. It was going really smoothly until I decided to try out Bitnami instead of the native PHP + Apache installs on my Ubuntu server – “if it ain’t broke…”, right?
But I did touch it and it did break. It turns out Bitnami has some php-fpm memory leaks that I couldn’t get around, and I figured I’d had enough of having to do sysadmin work for the time being. I decided I’d move to a managed hosting company where they’d take care of those issues for me. After some digging, I heard great things about SiteGround (yes, it’s an affiliate link – I like it so much that I endorse it) and decided to try it out.
After moving a few of my sites, I thought I’d share my experience on how to move a wordpress site. Yes, the title says it’s done in 10 minutes or less – I have it down to less than 5, honestly. It depends on how much practice you have, so your mileage may vary. 🙂
The rest of this article will assume that your new host give you access to cPanel and simple one-click WordPress installs. Let me know in the comments if you want the non-cPanel version and I’ll write it up.
Here are the ingredients you’ll need for a quick and easy move:
If you’re not familiar with SSH, you’ll be able to do everything using SFTP and other tools like phpMyAdmin, but I find SSH faster. If you’re stuck with a Windows computer, look into getting PuTTY installed. In my days of having to use Windows, I’d also always use Cygwin.
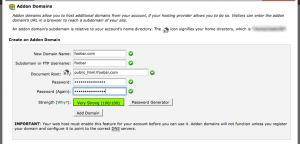
The first thing you need to do is make sure your new host is ready to receive your domain. Go to your cPanel Home and set up the domain you want to move. If it’s your account’s primary domain, that’s already done. If it’s a secondary domain, create it as an Addon Domain. Let’s assume it’s an addon domain.
Click on the Addon Domain icon in the domains section of cPanel. You’ll be taken to a page with a form to set up the new domain.

Fill in the form with your new domain. The rest (except for the password fields) will automatically be filled in for you. Feel free to change the default values, but for the purpose of this tutorial, we won’t change anything.

Click ‘Add Domain’ and this part is done. Next, we set up WordPress on the new domain.
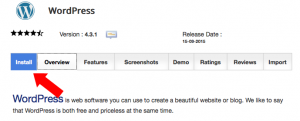
Back in your cPanel home, look for and click on the WordPress autoinstaller. Yes, you can choose to install WP yourself, but then you probably wouldn’t need these steps at all. But I digress…

SiteGround uses Softaculous to install applications. Granted, I don’t have much experience with cPanel (I’ve always done stuff manually) so I don’t know if it’s something every host uses or not. When you click on the WordPress autoinstaller, you’re taken to the Overview screen in the installer page. I’ve done this a few times now, and for some reason I’m wired to look for an install button at the bottom of the page. It’s not there. Look for the blue install button right next to the Overview tab.

Once you click on the ‘Install’ button, you’re presented with some basic fields to fill in. As you’re moving your site from your old host here, you really care about the following only:
Now, you’ll have to live with the fact that the database name and credentials will be different, so if you have any third-party connections to your existing WordPress install, make sure to change them later.
Click ‘Install’ and wait until the progress bar finishes. You’re now ready to receive your old WordPress.
The main thing here is that you want to export a dump of your old WordPress database. I use the terminal via SSH whenever I can. If you don’t like to use a terminal and SSH, export it via phpMyAdmin.
This is what I’d typically do via the terminal (on the old server):
$ mysqldump -u <username> -p <database> | gzip -c > old-wp-dump.sql.gz
Adding the password to the command line isn’t safe, so we leave it out and get prompted for it after we hit enter. Note that we’re also compressing on-the-fly.
Once you’re done with the database, make sure to create a tarball of your old wp-content directory as well.
$ cd /path/to/wordpress/install
$ tar -czvf old-wp-content.tar.gz wp-content/
Download both files to your computer (or leave them temporarily in a place where you can access them via a browser on your old server).
Now we need to get those two files into the new server. I’m still using SSH, but you can use SFTP if you want to.
First thing to do is to back up your new server’s automatically-created wp-content directory (or rename it using SFTP):
$ mv /path/to/www/foobar.com/wp-content /path/to/www/foobar.com/wp-content.orig
Back up the automatically-created database. You can find the credentials in your new wp-config.php file.
$ mysqldump -u <new-username> -p <new-database> | gzip -c > new-wp-backup.dump.sql.gz
Now move the old server’s files to your new server. If you chose to leave them in a place accessible via a browser, you can use wget (if it’s available in your new host – it is on SiteGround) to download them directly to your server. Otherwise use SCP or SFTP to upload them from your computer.
We’ll need to uncompress the files soon. Unfortunately, SiteGround doesn’t have gunzip, but you can get around that with gzip -d (and even create an alias for it in your ~/.bashrc file – alias gunzip="gzip -d ")
It’s time to do the actual move. The following commands will read the compressed information and handle them accordingly. To import the database, use mysql:
$ gunzip -c old-wp-dump.sql.gz | mysql -u <new-username> -p <new-database>
Again you’ll be prompted for the password after hitting enter. All of the old tables will be created, replacing the new ones as long as you used the correct table prefix when you ran the autoinstaller.
Now uncompress your old wp-content:
$ mv old-wp-content.tar.gz /path/to/www/foobar.com/
$ gunzip -c old-wp-content.tar.gz | tar -xf -
WordPress uses several Authentication Keys and Salts. In order to avoid issues logging into your new server’s install, you’ll have to replace the salts in the new wp-config.php with the ones from your old one.
The entry in wp-config.php typically looks like this:
/**#@+
 * Authentication Unique Keys and Salts.
 *
 * Change these to different unique phrases!
 * You can generate these using the {@link https://api.wordpress.org/secret-key/1.1/salt/ WordPress.org secret-key service}
 * You can change these at any point in time to invalidate all existing cookies. This will force all users to have to log in again.
 *
 * @since 2.6.0
 */
define('AUTH_KEY',         ';LM|C1Op{p`aE>6 FTO64{n#J2c,5KDK6:UxO.OGjHp[`<d%Wj<Fxid-Y_3}#rIn');
define('SECURE_AUTH_KEY',  '6b*K_`ie.A7b2):A-0&|arFv]+b04hT2g93TTRUJHBfp>DL=vJ-a}A9Rh:POjGg@');
define('LOGGED_IN_KEY',    'Q8853bl6ZP-F>r(>wpJhbQu>M|Jt{b6zCcUwR3oyA/6+y<~l#-~,JA-WE.L{ht+@');
define('NONCE_KEY',        'GzVYsIDpbKi%4,xVODWZRE3w?}ez9He@p7wD>I=cM VF[u6AuQF20Cta)Hr9s<hh');
define('AUTH_SALT',        'FmSUv`pq2|%K}yb~r*e)+(,G1}:7I7;/TBxg>h_Ejm0HDD:Y^G&x,yf9t9IRD$3p');
define('SECURE_AUTH_SALT', 'C,QO;+Iu0xw&U}x7}+O_2PS#wn:&z?zh5:75Ys}b[[email protected]|;dgR+R<u8%[B');
define('LOGGED_IN_SALT',   'T_[R}qRiDS2Ye2z|V:A8?ogn,nU[}[+!wcD#W!X.2)ZC8n5*)sC*Y%Ks*&vo++eT');
define('NONCE_SALT',       '[lP_CFP70&i6l- )z(6Cw <o<0ZDG?sxJ&o&.t|m!xkX!z3$QLB.[dG9XRHE^ yd');
Your migration is now ready for testing. Pull up your new server’s IP address from your cPanel home and add it to your /etc/hosts file (C:\Windows\System32\Drivers\etc\hosts in Windows)
123.123.123.123 foobar.com
Save the file and test your website. You should not see any difference at all when viewing it or logging in.
Once you’re satisfied, change the DNS A entry to point from the old IP to the new IP and that’s it! You’ve moved your website successfully. Allow for a couple of days of DNS propagation before taking your old one down.
As an added bonus, if you’re dealing with a high-traffic site that gets lots of database changes, you can set up Remote MySQL connections in cPanel, whitelisting your old server’s IP for incomming connections, and then change your old server’s wp-config.php to connect to your new server’s MySQL database. That way changes coming from people who still have a cached DNS entry pointing to the old server will be made on the new database automatically.

bbPress Notify (No-Spam) BuddyPress Bridge Documentation The BuddyPress Bridge is a premium add-on for bbPress Notify (No-Spam) – bbpnns – that lets you integrate bbpnns

bbPress Notify (No-Spam) Documentation The bbPress Notify (No-Spam) is a free plugin that lets you control who gets notifications of new Topics and Replies in
© UseStrict Consulting - All rights reserved
2 Responses
Well it works
It sure does. I’ve been doing this quite a lot lately.
Cheers,
Vinny